Write an article about
Chances are, you’ve used Canva — maybe to whip up a poster, design an Instagram story, or create something that just looks good without breaking being a professional designer.
But have you ever paused and thought: How did they build something like this?
A design tool that runs in the browser, feels effortless to use, and somehow makes everyone feel like a designer?
This is a long read, so make sure to bookmark
While I can’t really talk on how Canva was built, because I am not an engineer at Canva. But, inspired by Canva I have built something similar though for a very different use case.
I am going to be talking about PyUiBuilder, a convenient drag and drop tool like Canva I am working on to help Python developers develop Python GUI’s easily.
Before we start, feel free to check out the source code for PyUIBuilder, and make sure to star ⭐️ it so you can come back to it at a later point.
note, by the end of this blog you may have a high level overview of the thinking process and how things work, this is in no way a course on how to build Canva.
Planning ahead

So, before you start to write you first line of code. It’s always better to plan things such as how your UI’s supposed to look, what library/framework you plan to use, what features you would want to have and make a rough sketch in your mind on how different components/elements are supposed to come together.
It’s generally recommended to go with the framework/library you are comfortable with. Which, in my case it was Reactjs. Though I used JS for this project, for a big project like this one, I would highly recommend you start with TypeScript.
Project’s like this will have a lot of nested data structures and it would be so much easier to maintain and debug if you start with TS instead of JS. I believe I could have avoided many hours of headache if I had just started the entire project with TS.
Structuring your project
Once you have chosen you library/framework, it’s time to build the basic structure of the project. Structuring your project is a no brainer. Group things that go together and give each folder meaningful names.
Yep, that’s how I do it, if it’s a commonly used functions such as a sum function or a math related functions, create a folder called utilities and create file for each related functions and add them in respectively.
For example images goes inside, assets/images, now you can make this path more detailed as well like assets/images/home/, depending on your needs.
Now if these images are related to a component that has a lot is depended on other related smaller component, you could just move these assets inside the components folder and keep main assets in the root directory
Here’s a small part of how I have structured mine
.
|--- contexts
|   |--- fileUploadContext.js
|   |--- resizeContext.js
|--- constants
|   |--- frameworks.js
|--- index.js
|--- sidebar
|   |--- sidebar.js
|   |--- widgetsContainer.js
|   |--- utils
|   |   |--- premium.js
|   |   |--- share.js
|   |--- templatesContainer.js
|   |--- uploadsContainer.js
|   |--- pluginsContainer.js
|   |--- treeviewContainer.js
|--- dnd
|--- utils
|   |--- hooks.js
|   |--- common.js
|   |--- errors.js
|   |--- filter.js
|--- assets
|   |--- images
|   |   |--- doggy.png
|   |--- logo
|   |   |--- ko-fi.png
|   |   |--- bmc.svg
|   |   |--- logo.svg
|   |--- widgets
|   |   |--- button.png
|   |--- background
|   |   |--- dots.svg
|--- frameworks
|   |--- customtk
|   |   |--- constants
|   |   |   |--- fontFamily.js
|   |   |   |--- cursor.js

|   |--- utils
|   |   |--- pythonFilePath.js
|   |--- tkinter
|   |   |--- constants
|   |   |   |--- fontFamily.js
|   |   |   |--- cursor.js
|   |   |   |--- styling.js
|   |   |--- pythonWidgets
|   |   |   |--- imageLabel.py
|   |   |   |--- readme.md
|   |   |--- plugins
|   |   |   |   |--- entry.py
|   |   |   |--- code.js
.
.
.
Understanding PyUIBuilder
Before we begin, it’s important for you to understand a bit more about PYUiBuilder and the requirements/features.
PyUiBuilder is a Drag and drop GUI builder for python and it can output clean Python Code
let’s start with the requirements/features:
- The users must be able to drag and drop widgets to canvas.
- The canvas should be zoomable and pannable
- The widgets can contain child widgets inside them.
- The code must be extendable and reusable
Functional component vs Class based component for large apps
Now if you have read the React docs, you would know that Class based components are no longer recommended in favour of Function based components.
So, your natural choice might be to go with function components. However, something that function components lack is the inheritance and extensibility that class-based components provide. The abstraction layers you can create with class-based components are often harder to replicate with function components alone. Also, as function components grow larger, especially with lots of hooks, they can become messy and harder to manage.
That’s why I chose to use class-based components for parts of my app that required extensibility, and stuck with function components for everything else.
Creating the Canvas for PyUiBuilder
The main part of Canva or PyUIBuilder is of course the canvas. Thats where all the drag and drop elements go.
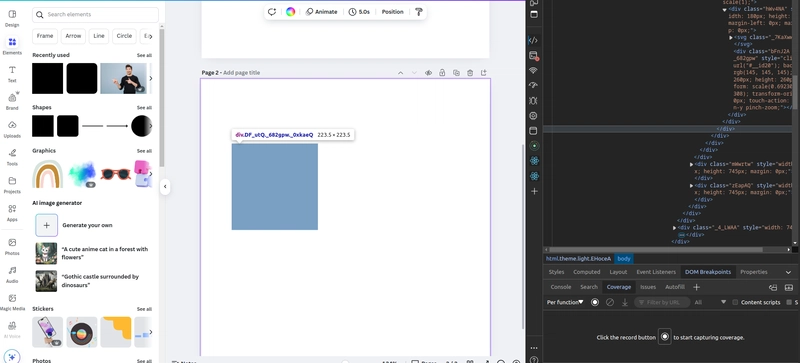
Now you might be tempted to use the regular Canvas element provided in the html. But a major problem with using that canvas is that it’s hard to debug when you add elements inside it.
So, a better approach would be to treat a div as Canvas and use it.
here’s an example code (use +/- keys to zoom in and out)
This is similar approach used by both Canva and PyUiBUilder (you can check this by opening the developer’s tool)
Data structure and single source of truth
One of the major parts of building a PyUibuilder like app is the datastructure, especially deciding on how you are going to create a nested structure.
It can become easy to lose track of all the variables and changes. So, I can’t have multiple variables keeping track of the same piece of information. So, it’s better to avoid passing it as a props down the components or prop drilling
So I’d use React context or state management library like redux
I chose to have all the information about the widgets in a react context after experimenting different approaches.
The data structure looks something like this
[
  {
    id: "", // id of the widget
    widgetType: WidgetClass,  // base widget
    children: [], // children will also have the same datastructure as the parent
    parent: "", // id of the parent of the current widget
    initialData: {} // information about the widget's data that's about to be rendered eg: backgroundColor, foregroundColor etc.
  }
]
It’s based on this data structure the components are rendered
Building the drag and drop
When starting out I had researched on a couple of libraries such as React-beautiful-Dnd, React Dnd-kit and React Swappy.
After researching I saw that react-beautiful-dnd was no longer maintained and started with React dnd-kit. As a started building, I found the dnd-kit’s documentation quite limited for what I was building, Plus, a new release with major changes to library was coming out soon, so I decided to drop react-dnd-kit until the major release.
I rewrote the parts of where I used DND-kit with HTML’s Drag and Drop API. Only limitation with the native Drag and drop API was that it’s still not supported by some touch devices, which didn’t matter to me because I was building for non-touch devices.
React Context managers
My app allowed asset upload, now these assets where to be used by the widgets/elements in the canvas. So how would you pass the assets to the widgets?
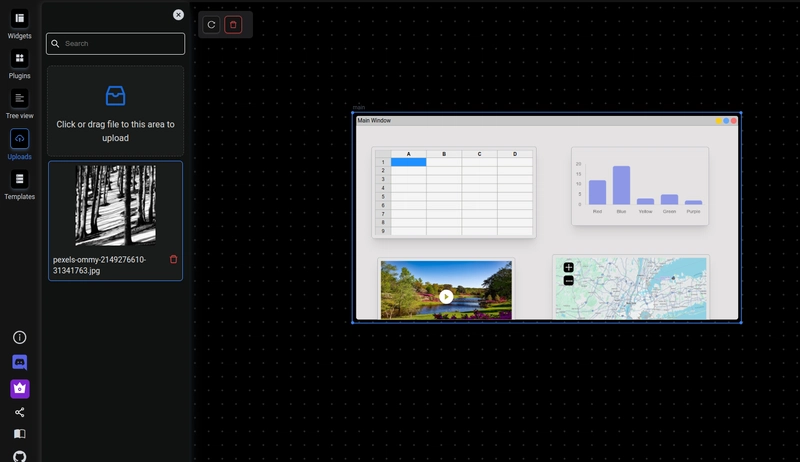
Now I wanted the assets uploaded in the sidebar accessible by toolbar of the widgets. But every time I switch the sidetabs, the re-render caused the uploaded assets to disappear.
Now you might think of using Redux, but One of the biggest limitations with Redux is that you can only store serializable data. Non-serializable data such as image, video, other assets cannot be stored on redux. This would make it harder to pass data around different component.
One way to overcome this is to use React Context. In brief, React Context provides a way to pass data through the component tree without having to pass props down manually at every level.
All I would have to do to have the data in different components was to wrap it around a React context provider.
I Created my own context providers for couple of things:
- Drag and drop – Enabling dragging and dropping from sidebar + dragging and dropping withing child elements.
- File upload – To make the uploaded files accessible on the toolbar for each widget.
- Storing widgets – To make it accessible to both Tree view and the canvas
Here is a simple example of how I used React context for Drag and drop.
import React, { createContext, useContext, useState } from 'react'

const DragWidgetContext = createContext()

export const useDragWidgetContext = () => useContext(DragWidgetContext)

// Provider component to wrap around parts that need drag-and-drop functionality
export const DragWidgetProvider = ({ children }) => {
    const [draggedElement, setDraggedElement] = useState(null)

    const onDragStart = (element) => {
        setDraggedElement(element)
    }

    const onDragEnd = () => {
        setDraggedElement(null)
    }

    return (
        <DragWidgetContext.Provider value={{ draggedElement, onDragStart, onDragEnd }}>
            {children}
        </DragWidgetContext.Provider>
    )
}
Yes! that’s it. All I had to do now was to wrap it around the component where I needed the context, which in my case was over Canvas and sidebar.
Final notes
Thank you for reading the entire thing. Hope you have learnt a thing or two on how to build a complex app like Canva/PyUiBuilder.
If you want to study the source code you can do so here.
.Organize the content with appropriate headings and subheadings ( h2, h3, h4, h5, h6). Include conclusion section and FAQs section with Proper questions and answers at the end. do not include the title. it must return only article i dont want any extra information or introductory text with article e.g: ” Here is rewritten article:” or “Here is the rewritten content:”