Write an article about
This is the second post in the LLM Benchmarking series, which shows how to use GenAI-Perf to benchmark the Meta Llama 3 model when deployed with NVIDIA NIM.
When building LLM-based applications, it is critical to understand the performance characteristics of these models on a given hardware. This serves multiple purposes:
- Identifying the bottleneck and potential optimization opportunities
- Identifying the quality of service and throughput tradeoff
- Infrastructure provisioning
As a client-side LLM-focused benchmarking tool, NVIDIA GenAI-Perf provides key metrics:
- Time to first token (TTFT)
- Inter-token latency (ITL)
- Tokens per second (TPS)
- Requests per second (RPS)
- …and more
GenAI-Perf also supports any LLM inference service conforming to the OpenAI API specification, a widely accepted default standard in the industry.
For this benchmarking guide, we used NVIDIA NIM, a collection of inference microservices that offer high-throughput and low-latency inference for both base and fine-tuned LLMs. NIM features ease-of-use and enterprise-grade security and manageability.
To optimize your AI application, this post walks through the process of setting up a NIM inference microservice for Llama 3, using GenAI-Perf to measure the performance, and analyzing the outputs.
Why use GenAI-Perf for benchmarking model performance?
NVIDIA NIM microservices are prepackaged, optimized containers that make it easy to deploy and run AI models across various platforms, including clouds, data centers, and NVIDIA RTX AI PCs, accelerating generative AI development for any domain. NIM LLMs are powered by industry-leading backends, including TensorRT-LLM and vLLM. NIM is continually improved to provide optimal performance even on the same hardware generation.
GenAI-Perf enables you to not only reproduce and validate these performance results but to do benchmarking using your own hardware. For more information about this process, see NVIDIA NIM Performance.
Steps for benchmarking with NIM
All the performance figures on the NIM Performance page were collected with the NVIDIA GenAI-Perf tool. Following the step-by-step recipe presented in the rest of this post, you can reproduce these performance numbers, as well as benchmark models on your own hardware.
Setting up an OpenAI-compatible Llama-3 inference service with NIM
NIM provides the easiest and quickest way to put LLMs and other AI foundation models into production. For more information, see A Simple Guide to Deploying Generative AI with NVIDIA NIM or the latest NVIDIA NIM for Large Language Models documentation, which walks you through the hardware requirements and prerequisites, including NVIDIA NGC API keys.
Use the following commands to deploy NIM and execute inference:
export NGC_API_KEY=
# Choose a container name for bookkeeping
export CONTAINER_NAME=llama-3.1-8b-instruct
# Choose a LLM NIM Image from NGC
export IMG_NAME=”nvcr.io/nim/meta/${CONTAINER_NAME}:latest”
# Choose a path on your system to cache the downloaded models
export LOCAL_NIM_CACHE=./cache/nim
mkdir -p “$LOCAL_NIM_CACHE”
# Start the LLM NIM
docker run -it –rm –name=$CONTAINER_NAME \
–gpus all \
–shm-size=16GB \
-e NGC_API_KEY \
-v “$LOCAL_NIM_CACHE:/opt/nim/.cache” \
-u $(id -u) \
-p 8000:8000 \
$IMG_NAME
In this code example, we specified the Meta Llama-3.1-8b-Instruct model, which is also the name of the container. We also provided and mounted a local directory as a cache directory where downloaded model assets are persisted.
During startup, the NIM container downloads the required resources and begins serving the model behind an API endpoint. The following message indicates a successful startup:
INFO: Application startup complete.
INFO: Uvicorn running on http://0.0.0.0:8000 (Press CTRL+C to quit)
When running, NIM provides an OpenAI-compatible API that you can query:
from openai import OpenAI
client = OpenAI(base_url=”http://0.0.0.0:8000/v1″, api_key=”not-used”)
prompt = “Once upon a time”
response = client.completions.create(
model=”meta/llama-3.1-8b-instruct”,
prompt=prompt,
max_tokens=16,
stream=False
)
completion = response.choices[0].text
print(completion)
Setting up GenAI-Perf and benchmarking a single use case
Now that you have the NIM Llama-3 inference service running, next set up the benchmarking tool.
The easiest way to do this is using a prebuilt Docker container. We recommend starting a GenAI-Perf container on the same server as NIM to avoid network latency, unless you specifically want to factor in the network latency as part of the measurement.
For more information about getting started, see the GenAI-Perf documentation.
Run the following commands to use the prebuilt container.
export RELEASE=”24.12″ # recommend using latest releases in yy.mm format
docker run -it –net=host –gpus=all -v $PWD:/workdir nvcr.io/nvidia/tritonserver:${RELEASE}-py3-sdk
You should mount a directory from the host machine into the container, so that benchmarking assets can be persisted. In the earlier example, we mounted the current directory.
Inside the container, you can fire up the GenAI-Perf evaluation harness as follows, which carries out a warming load test on the NIM backend:
export INPUT_SEQUENCE_LENGTH=200
export INPUT_SEQUENCE_STD=10
export OUTPUT_SEQUENCE_LENGTH=200
export CONCURRENCY=10
export MODEL=meta/llama-3.1-8b-instruct
genai-perf profile \
-m $MODEL \
–endpoint-type chat \
–service-kind openai \
–streaming \
-u localhost:8000 \
–synthetic-input-tokens-mean $INPUT_SEQUENCE_LENGTH \
–synthetic-input-tokens-stddev $INPUT_SEQUENCE_STD \
–concurrency $CONCURRENCY \
–output-tokens-mean $OUTPUT_SEQUENCE_LENGTH \
–extra-inputs max_tokens:$OUTPUT_SEQUENCE_LENGTH \
–extra-inputs min_tokens:$OUTPUT_SEQUENCE_LENGTH \
–extra-inputs ignore_eos:true \
–tokenizer meta-llama/Meta-Llama-3.1-8B-Instruct \
— \
-v \
–max-threads=256
In this minimal example, we specified the input and output sequence length and a concurrency to test. We also asked the backend to ignore the special EOS tokens, so that the output reaches the intended length.
This test uses the Llama-3 tokenizer from Hugging Face, which is a guarded repository. You must apply for access and then log in with your Hugging Face credential.
pip install huggingface_hub
huggingface-cli login
For more information about the full set of options and parameters, see the GenAI-Perf documentation.
Upon successful execution, you should see results similar to the following in the terminal:
Figure 1. Sample output by genAI-perf
Sweeping through several use cases
With benchmarking, a test would typically be set up to sweep over, or execute, several use cases (input and output length combinations) and load scenarios (different concurrency values). Using the following BASH script, define the parameters so that GenAI-Perf executes through all the combinations.
Before doing a benchmarking sweep, we recommend running a warm-up test. In our case, we did this while setting up GenAI-Perf and a single use case.
In the GenAI-Perf container, run the following command:
Here’s the benchmark.sh script:
declare -A useCases
# Populate the array with use case descriptions and their specified input/output lengths
useCases[“Translation”]=”200/200″
useCases[“Text classification”]=”200/5″
useCases[“Text summary”]=”1000/200″
useCases[“Code generation”]=”200/1000″
# Function to execute genAI-perf with the input/output lengths as arguments
runBenchmark() {
local description=”$1″
local lengths=”${useCases[$description]}”
IFS=’/’ read -r inputLength outputLength <<< "$lengths"
echo "Running genAI-perf for $description with input length $inputLength and output length $outputLength"
#Runs
for concurrency in 1 2 5 10 50 100 250; do
local INPUT_SEQUENCE_LENGTH=$inputLength
local INPUT_SEQUENCE_STD=0
local OUTPUT_SEQUENCE_LENGTH=$outputLength
local CONCURRENCY=$concurrency
local MODEL=meta/llama-3.1-8b-instruct
genai-perf profile \
-m $MODEL \
--endpoint-type chat \
--service-kind openai \
--streaming \
-u localhost:8000 \
--synthetic-input-tokens-mean $INPUT_SEQUENCE_LENGTH \
--synthetic-input-tokens-stddev $INPUT_SEQUENCE_STD \
--concurrency $CONCURRENCY \
--output-tokens-mean $OUTPUT_SEQUENCE_LENGTH \
--extra-inputs max_tokens:$OUTPUT_SEQUENCE_LENGTH \
--extra-inputs min_tokens:$OUTPUT_SEQUENCE_LENGTH \
--extra-inputs ignore_eos:true \
--tokenizer meta-llama/Meta-Llama-3-8B-Instruct \
--measurement-interval 30000 \
--profile-export-file ${INPUT_SEQUENCE_LENGTH}_${OUTPUT_SEQUENCE_LENGTH}.json \
-- \
-v \
--max-threads=256
done
}
# Iterate over all defined use cases and run the benchmark script for each
for description in "${!useCases[@]}"; do
runBenchmark "$description"
done
The –measurement-interval 30000 parameter is the time interval used for each measurement in milliseconds. GenAI-Perf measures the requests that finish in a specified time interval. Choose a value big enough for several requests to finish. For larger networks, such as Llama-3 70B, and more concurrency, such as 250, choose a higher value. For example, you could use 100000 ms, which is 100 sec.
Analyzing the output
When the tests are complete, GenAI-Perf generates the structured outputs in a default directory named \artifacts, organized by model name, concurrency, and input/output length.
artifacts
├── meta_llama-3.1-8b-instruct-openai-chat-concurrency1
│ ├── 1000_200.json
│ ├── 1000_200_genai_perf.csv
│ ├── 1000_200_genai_perf.json
│ ├── 200_1000.json
│ ├── 200_1000_genai_perf.csv
│ ├── 200_1000_genai_perf.json
│ ├── 200_200.json
│ ├── 200_200_genai_perf.csv
│ ├── 200_200_genai_perf.json
│ ├── 200_5.json
│ ├── 200_5_genai_perf.csv
│ ├── 200_5_genai_perf.json
│ └── inputs.json
├── meta_llama-3.1-8b-instruct-openai-chat-concurrency10
│ ├── 1000_200.json
│ ├── 1000_200_genai_perf.csv
│ ├── 1000_200_genai_perf.json
│ ├── 200_1000.json
│ ├── 200_1000_genai_perf.csv
│ ├── 200_1000_genai_perf.json
│ ├── 200_200.json
│ ├── 200_200_genai_perf.csv
│ ├── 200_200_genai_perf.json
│ ├── 200_5.json
│ ├── 200_5_genai_perf.csv
│ ├── 200_5_genai_perf.json
│ └── inputs.json
├── meta_llama-3.1-8b-instruct-openai-chat-concurrency100
│ ├── 1000_200.json
…
The *genai_perf.csv files are the main benchmarking results. You can read all the request-per-second (RPS) and time-to-first-token (TTFT) metrics across all concurrencies for a given use case, such as ISL/OSL of 200/5, with the following code:
import os
import pandas as pd
root_dir = “./artifacts”
directory_prefix = “meta_llama-3.1-8b-instruct-openai-chat-concurrency”
concurrencies = [1, 2, 5, 10, 50, 100, 250]
RPS = []
TTFT = []
for con in concurrencies:
df = pd.read_csv(os.path.join(root_dir, directory_prefix+str(con), f”200_5_genai_perf.csv”))
RPS.append(float(df.iloc[8][‘avg’].replace(‘,’, ”)))
TTFT.append(float(df.iloc[0][‘avg’].replace(‘,’, ”)))
Finally, you can plot and analyze the latency-throughput curve using the collected data with the following code. Here, each data point corresponds to a concurrency value.
import matplotlib.pyplot as plt
plt.plot(TTFT, RPS, ‘x-‘)
plt.xlabel(‘TTFT(ms)’)
plt.ylabel(‘RPS’)
labels = [1, 2, 5, 10, 50, 100, 250]
# Add labels to each data point
for i, label in enumerate(labels):
plt.annotate(label, (TTFT[i], RPS[i]), textcoords=”offset points”, xytext=(0,10), ha=’center’)
Figure 2 shows the resulting plot using GenAI-Perf measurement data.
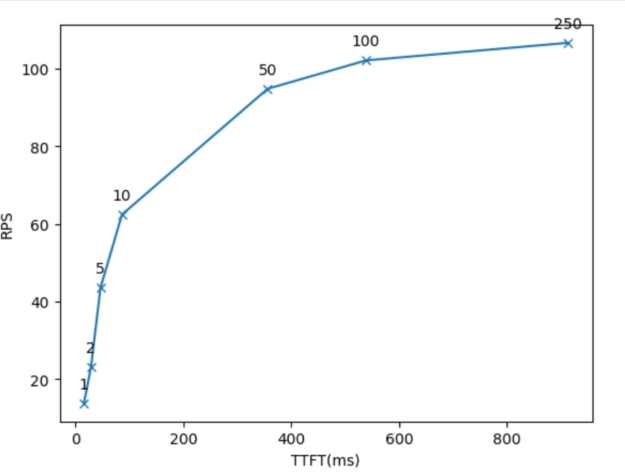 Figure 2. Latency-throughput curve plot using data generated by GenAI-Perf
Interpreting the results
Figure 2 shows TTFT on the x-axis, total system throughput on the y-axis, and concurrencies on each dot. There are several ways to use the plot:
- An LLM application owner who has a latency budget, for example, the maximum TTFT that is acceptable, can use that value for x, and look for the matching y value and the concurrencies. That shows the highest throughput that can be achieved with that latency budget and corresponding concurrency value.
- An LLM application owner can use the concurrency values to locate corresponding dots on the graph. The x and y values at the dots show the latency and throughput for that concurrency level.
Figure 2 also shows the concurrencies where latency grows quickly with little or no throughput gain. For example, concurrency=50 is one such value.
Similar plots can use ITL, e2e_latency, or TPS_per_user as the x-axis, showing the trade-off between total system throughput and individual user latency.
Benchmarking customized LLMs
LLMs nowadays can cater well to many common tasks, such as open QA or meeting summarization.
However, there are tasks that can benefit hugely from customizing LLMs, such as training them on the internal corporate knowledge base so that they get used to the internal work cultures, know-how and protocol, specific product portfolios, and the acronyms, or even using internal productivity tools.
NIM enables customized models to be served. NIM supports low-rank adaptation (LoRA), which is a simple and efficient way to tailor LLMs for specific domains and use cases. To customize LLM with LoRA, you can make use of NVIDIA NeMo, an open-source platform for training generative AI models. When you’re done, you can load and deploy multiple LoRA adapters using NIM.
First, put the NVIDIA NeMo-trained LoRA adapters into a certain directory structure and then pass the adapter folder name to NIM as an environment variable, following the instructions at Parameter-Efficient Fine-Tuning. NIM also supports LoRA adapters trained with the HuggingFace PEFT library.
After it’s added, the LoRA model can be queried similar to the base model by replacing the base model ID with the LoRA model name:
curl -X ‘POST’ \
‘http://0.0.0.0:8000/v1/completions’ \
-H ‘accept: application/json’ \
-H ‘Content-Type: application/json’ \
-d ‘{
“model”: “llama3-8b-instruct-lora_vhf-math-v1”,
“prompt”: “John buys 10 packs of magic cards. Each pack has 20 cards and 1/4 of those cards are uncommon. How many uncommon cards did he get?”,
“max_tokens”: 128
}’
With GenAI-Perf, the deployment metrics for LoRA models can be benchmarked by passing the IDs of the LoRA models through the -m argument:
genai-perf profile \
-m llama-3-8b-lora_1 llama-3-8b-lora_2 llama-3-8b-lora_3 \
–model-selection-strategy random \
–endpoint-type completions \
–service-kind openai \
–streaming \
In this case, three LoRA models are being tested:
- llama-3-8b-lora_1
- llama-3-8b-lora_2
- llama-3-8b-lora_3
The –model-selection-strategy {round_robin,random} parameter specifies whether these adapters should be called in a round-robin or random fashion.
Conclusion
The NVIDIA GenAI-Perf tool was created to meet the urgent need for benchmarking solutions powered by LLM serving at scale. It supports NVIDIA NIM, as well as other OpenAI-compatible LLM serving solutions.
This post provided you with the most important, popular metrics and parameters to help standardize how model benchmarking takes place across the industry.
For more information and expert guidance on how to select the right metrics and optimize your AI application’s performance, see the LLM Inference Sizing: Benchmarking End-to-End Inference Systems GTC session.
.Organize the content with appropriate headings and subheadings ( h2, h3, h4, h5, h6). Include conclusion section and FAQs section with Proper questions and answers at the end. do not include the title. it must return only article i dont want any extra information or introductory text with article e.g: ” Here is rewritten article:” or “Here is the rewritten content:”