Home Blog Page 475

TCL’s AI Short Films

0

Five New AI-Generated Short Films from TCL

5. Sun Day

This futuristic short film basically has the same concept as Ray Bradbury’s short story “All Summer in a Day.” It follows a young girl who lives on a planet where the sun only comes out every seven years, but just 10 people can see it at a time from the top of a building called the “Citadel.” Well, this girl wins a lottery to get a rooftop view of the sun, but two bullies lock her in a room to prevent her from getting to the Citadel.

The AI-generated sequences become pretty hard to follow as she tries to navigate her way out through the sewers beneath the school. She somehow gets in touch with her dad (telepathically?), who just so happens to be a maintenance worker who knows his way through the underground. There, she encounters purple rats on her way to some kind of elevator (?) that turns into a rocket and blasts her to a rooftop (?) where she can finally see the sun.

The voice acting in this isn’t bad, but the lack of facial expression was pretty laughable (just look at this scene).

4. Project Nexus

Project Nexus is more like a five-minute trailer than a short film, and unlike TCL’s other AI movies, this one is meant to depict animated characters, rather than attempting to make them look as human as possible. It starts like this: a man finds what looks like a radioactive rock and then coordinates the arrest of a group of four teens, who then get some sort of supernatural powers after the rock explodes beneath their prison.

They use these newfound powers to escape the prison, and that’s where it ends with a “to be continued.” I thought that maybe the facial expressions would be better because the characters aren’t meant to look fully human, but that definitely wasn’t the case here. This film’s story is probably the most compelling out of the bunch — the AI-generated animation and questionable voice acting just make it hard to watch.

3. The Best Day of My Life

This is a docufiction-style short film, which has an actor playing Dr. Warren Brown use AI to retell the harrowing story of how he lost his leg after getting trapped in an avalanche atop Chile’s Cerro Castillo mountain — and it’s hard to tell which parts of the story (if any) actually happened.

Though the majority of the film is an AI flashback, showing clips of Brown and his friend traversing the snowy mountaintop, it cuts between scenes with the real, human actor who plays Brown and narrates the story. It’s basically like watching an Investigation Discovery show, but with all the “dramatic recreations” made with AI.

The story starts to lose me after it shows an AI-generated image of a severed leg, followed by a trippy sequence of Brown’s “life flashing before his eyes,” which, for some reason, includes a zebra morphing into a lion. I visibly cringed at the ending when Brown called this the “best day” of his life.

2. The Audition

At first, The Audition didn’t seem that bad. But what I thought was a silly skit involving an actor auditioning for a role in front of a picky casting director devolved into some weird and unfunny attempts at comedy. After asking the actor to try on various accents, the casting director’s requests get more specific — he should be younger, maybe look more like Brad Pitt (with elf ears, for some reason).

Magically, with the power of AI, the actor turns into everything the casting director wants him to be and even deepfakes him into different scenes from iconic movies like Indiana Jones and E.T. Guess what? In the end, the casting director turns him away because she wants something “different.” When he walks out, clones of him practice their lines in the waiting room.

1. The Slug

Okay, I really hate this. It’s like if Franz Kafka had access to AI and generated The Metamorphosis. The gist of it is this: a woman is suffering from a bad case of arthritis, and she tries to reach out to family members and her doctor by phone, but they don’t pick up. It doesn’t seem like she can get out of the house due to her pain, which is why she looks so longingly out the window when she places a slug outside.

Things get real weird after this. Her hands and feet become covered in slime, until her body gradually morphs into a full-on slug. Viewer discretion is advised, because it’s honestly kind of disturbing. Once the metamorphosis is complete, she inches her way out of the house in slug form, and someone finally returns her call. How tragic.

It’s clear that TCL still has a lot to learn when it comes to creating believable and engaging AI-generated content. While some of these films show promise, most of them are plagued by poor animation, cringeworthy voice acting, and bizarre storylines. Until they can improve these areas, it’s best to stick to traditional filmmaking methods.

Q: Are these films available to stream on TCLtv Plus?
A: Yes, all five short films are currently available to stream on TCLtv Plus.

Q: Are there any plans to release these films on other platforms?
A: TCL has not announced any plans to release these films on other platforms, but they may consider it in the future.

Q: Can I purchase a copy of these films?
A: Unfortunately, TCL has not made any of these films available for purchase or download.

Boost Llama 3.3: 70B Inference Throughput 3x with NVIDIA TensorRT-LLM

0

Achieving Throughput Speedups with Draft Target Speculative Decoding

Meta’s Llama collection of open large language models (LLMs) continues to grow with the recent addition of Llama 3.3 70B, a text-only instruction-tuned model. Llama 3.3 provides enhanced performance respective to the older Llama 3.1 70B model and can even match the capabilities of the larger, more computationally expensive Llama 3.1 405B model on several tasks including math, reasoning, coding, and multilingual support.

NVIDIA TensorRT-LLM, a powerful inference engine that delivers state-of-the-art performance on the latest LLMs, incorporates many optimizations to deliver outstanding Llama 3.3 70B inference throughput. These include in-flight batching, KV caching, custom FP8 quantization, speculative decoding, and more for fast, cost-efficient LLM serving.

Optimizations for High-Performance Deep Learning Inference

TensorRT-LLM supports batching multiple different requests at the same time for higher serving throughput. By interleaving requests in context and generation phases, in-flight batching reduces latency and improves GPU utilization by executing new requests while older requests are still in flight. Finished requests are evicted from the batch, making room for the next set of requests.

Caching the values of the key-value elements of previous tokens saves from expensive recomputation of these tensors in the generation phase for the next set of tokens. Computational savings effectively lead to higher throughput. However, KV cache grows linearly in size with number of batched requests and sequence context lengths, leading to higher memory requirements.

TensorRT-LLM KV caching addresses these challenges through several optimizations, including support for paged KV cache, quantized KV cache, circular buffer KV cache, and KV cache reuse. Each of these optimizations addresses the challenging balance between growing memory size and avoiding unnecessary and expensive recomputation.

Speculative decoding is a popular technique for faster and cost-effective LLM inference with built-in verification for the quality of output generation. It’s based on the premise that generating multiple sequences of future (draft) tokens is more efficient than processing a single token in autoregressive decoding, an inherently time-consuming process. The target model determines how many of these draft tokens to accept, which is far more efficient than having to generate one token per iteration. TensorRT-LLM supports a growing list of speculative decoding techniques, including draft target, Medusa, Eagle, and lookahead decoding, among others.

Achieving Throughput Speedups with Draft Target Speculative Decoding

Table 1 and Figure 2 highlight the throughput (output tokens/second) speedups between no draft model (that is, no speculative decoding) versus draft models of various sizes with Llama 3.3 70B target model.

Steps to Reproduce Performance Gains

Download the following model checkpoints from Hugging Face and store them in a directory for easy access through the setup process.

git lfs install

# Download target models
git clone https://huggingface.co/meta-llama/Meta-Llama-3.3-70B-Instruct

# Download draft models
git clone https://huggingface.co/meta-llama/Llama-3.2-1B-Instruct
git clone https://huggingface.co/meta-llama/Llama-3.2-3B-Instruct
git clone https://huggingface.co/meta-llama/Llama-3.1-8B-Instruct

After the model checkpoints have been downloaded, install TensorRT-LLM.

# Obtain and start the basic docker image environment (optional).
docker run –rm –ipc=host –runtime=nvidia –gpus all –entrypoint
/bin/bash -it nvidia/cuda:12.5.1-devel-ubuntu22.04

# Install dependencies, TensorRT-LLM requires Python 3.10
apt-get update && apt-get -y install python3.10 python3-pip openmpi-bin
libopenmpi-dev git git-lfs

# Fetch the library
git clone -b v0.15.0 https://github.com/NVIDIA/TensorRT-LLM.git
cd TensorRT-LLM

# Install the latest version (corresponding to the main branch) of TensorRT-LLM.
pip3 install tensorrt_llm -U –extra-index-url https://pypi.nvidia.com

# Check installation
python3 -c “import tensorrt_llm”

Next, compile the downloaded model checkpoints into draft and target TensorRT engines. These engines are optimized to run inference with best accuracy and highest throughput.

cd examples

# Steps to build target and draft models in FP8 precision on 1 H200

# Create FP8 checkpoints

python3 quantization/quantize.py –model_dir –dtype float16 –qformat fp8 –kv_cache_dtype fp8
–output_dir /ckpt-draft –calib_size 512 –tp_size 1

python3 quantization/quantize.py \
–model_dir= \
–output_dir=./ckpt-target-70b \
–dtype=float16 –qformat fp8 –kv_cache_dtype fp8 \
–calib_size 512 –tp_size 1

# Build draft and target engines
# Important flags for the engine build process:
# –use_paged_context_fmha=enable must be specified since we need KVcache reuse for the draft/target model.

# –speculative_decoding_mode=draft_tokens_external and –max_draft_len must be specified for target model.

trtllm-build \
–checkpoint_dir./ckpt-draft \
–output_dir=./draft-engine \
–gpt_attention_plugin float16 \
–workers 1 \
–gemm_plugin=fp8 \
–use_paged_context_fmha=enable \
–multiple_profiles enable \
–max_batch_size=32 \
–max_seq_len=131072

trtllm-build \
–checkpoint_dir=./ckpt-target-70b \
–output_dir=./target-engine \
–gpt_attention_plugin float16 \
–workers 1 \
–gemm_plugin=fp8 \
–use_paged_context_fmha=enable \
–multiple_profiles enable \
–max_batch_size=32 \
–max_seq_len=131072 \
–low_latency_gemm_plugin fp8 \
–speculative_decoding_mode=draft_tokens_external \
–max_draft_len 10

Finally, run speculative decoding in TensorRT-LLM.

#Run decoding

# Important flags to set during the run process:
#–draft_engine_dir and –engine_dir must be specified for the draft and target engines.

#–draft_target_model_config is corresponding to the configuration of
Draft-Target-Model. As an example, [4,[0],[1],False] means draft_len=4,
device of draft model is GPU0, device of target model is GPU1, and use
tokens rather than logits to accept.

# Only CPP session (using executor as low-level API) is supported, while
Python session (–use_py_session) is not supported.

# Run with Llama 3.3 70B target model

mpirun -n 1 –allow-run-as-root python3./run.py \
–tokenizer_dir \
–draft_engine_dir./draft-engine \
–engine_dir./target-engine \
–draft_target_model_config = “[10,[0,1,2,3,4,5,6,7],[0,1,2,3,4,5,6,7], False]” \
–kv_cache_free_gpu_memory_fraction=0.35 \
–max_output_len=1024 \
–kv_cache_enable_block_reuse \

–input_text=”

Mastering Flux Tools in ComfyUI

0

Flux ControlNet Guide and Workflow

Introduction

Flux ControlNet is a powerful tool for AI-generated images, and in this article, we will dive into its features and workflow. We will also introduce LTX Studio, a sponsor of our video content, and their free open-source AI video model.

Getting Started with Flux ControlNet

Before we dive into the details of Flux ControlNet, let’s take a look at the video sponsor, LTX Studio, and their free open-source AI video model. You can access the model by clicking on the link provided.

How to Use Flux Tools ControlNet

To get started with Flux ControlNet, you will need to download the tool and its models. Once you have downloaded the tool, follow these steps:

  1. Open the Flux ControlNet tool and select the model you want to use.
  2. Upload your image or video to the tool.
  3. Adjust the settings to your liking.
  4. Click on the "Generate" button to create your AI-generated image or video.

Detailed Tips and Tricks

Here are some detailed tips and tricks to help you get the most out of Flux ControlNet:

  • Use the right model: Make sure to use the right model for your task. Flux ControlNet comes with a variety of models, each with its own strengths and weaknesses.
  • Adjust the settings: Experiment with different settings to find the perfect balance between quality and speed.
  • Use the right resolution: Make sure to use the right resolution for your output. Flux ControlNet can generate images and videos in a variety of resolutions.

LTX Video Sponsor – Best Open Source AI Video Model?

We would like to take a moment to thank our sponsor, LTX Studio, for their support. Their free open-source AI video model is a game-changer for anyone looking to create AI-generated videos. You can access the model by clicking on the link provided.

Conclusion

In this article, we have covered the basics of Flux ControlNet and how to use it to generate AI-generated images and videos. We have also introduced LTX Studio and their free open-source AI video model. With Flux ControlNet and LTX Studio’s model, you have the power to create amazing AI-generated content.

FAQs

Q: What is Flux ControlNet?
A: Flux ControlNet is a tool for generating AI-generated images and videos.

Q: How do I get started with Flux ControlNet?
A: To get started with Flux ControlNet, you will need to download the tool and its models. Once you have downloaded the tool, follow the steps outlined in this article.

Q: What is LTX Studio?
A: LTX Studio is a sponsor of our video content and provides a free open-source AI video model.

Q: How do I access LTX Studio’s AI video model?
A: You can access LTX Studio’s AI video model by clicking on the link provided.

Q: What are some tips and tricks for using Flux ControlNet?
A: Some tips and tricks for using Flux ControlNet include using the right model, adjusting the settings, and using the right resolution.

AI News before 2025: Kling 1.6, Pika 2.0, Google VEO 2, Copilot

0

AI Video Generation Models: The Latest Developments and Trends

1. KLING AI 1.6 – A Game Changer!

KLING AI has just launched its latest model, Kling 1.6, which boasts a 195% improvement in video generation capabilities! This upgrade enhances prompt adherence, allowing for more vivid and consistent video outputs. Whether you’re a beginner or a pro, Kling 1.6 offers modes tailored to your needs, making video creation easier and more dynamic than ever!

2. Pika 2.0 – FREE Access!

Pika 2.0 is here, and it’s completely FREE until 22nd Dec! This model is designed to help users create stunning videos effortlessly, featuring advanced customization options that cater to all skill levels.

3. Google VEO 2 – Mind-Blowing Innovations!

Google’s new VEO 2 model has taken the AI world by storm with its incredible realism and cinematic quality! Expect amazing physics and prompt understanding that allows for lifelike animations and stunning visual storytelling. This tool is set to redefine how we create and interact with AI-generated content!

4. Copilot – Your FREE Creative Assistant!

Don’t miss out on Copilot, now available for FREE! This tool integrates seamlessly into your workflow, helping you generate creative ideas and manage your projects with ease.

Latest Video Generation Models and Updates

Conclusion

The latest developments in AI-generated video content have revolutionized the way we create and interact with visual storytelling. These innovative models offer unprecedented capabilities, from free access to advanced customization options. Whether you’re a beginner or a pro, there’s never been a better time to explore the world of AI-generated video content. Stay ahead of the curve and discover the latest trends and updates in AI video generation!

FAQs

Q: What is the latest model from KLING AI?
A: KLING AI 1.6, which boasts a 195% improvement in video generation capabilities.

Q: Is Pika 2.0 free?
A: Yes, Pika 2.0 is available for free until 22nd Dec.

Q: What is Google VEO 2?
A: Google VEO 2 is a new model from Google that has taken the AI world by storm with its incredible realism and cinematic quality.

Q: What is Copilot?
A: Copilot is a free creative assistant that helps you generate creative ideas and manage your projects with ease.

Q: How can I stay updated on the latest AI video generation models and trends?
A: Join my Facebook Group: https://www.facebook.com/groups/theairevolution, join my Discord Group: https://discord.gg/XKAk7GUzAW, and support me on Patreon: https://www.patreon.com/sarikas

Web Authentication Showdown: Sessions vs JWTs

0

Session-Based Authentication vs JWT-Based Authentication: Choosing the Right Approach

Session-Based Authentication

Here’s how session-based authentication works:

  1. Login and Session Creation:

    • The user sends login credentials to the server.
    • The server verifies them and, if valid, creates a session.
    • Session data (e.g., user ID, expiration time) is stored on the server in a database or cache like Redis.
  2. Session ID:

    • The server sends a unique session ID to the client, usually as a cookie.
  3. Subsequent Requests:

    • The client automatically sends the session ID cookie with each request.
    • The server uses this ID to retrieve session data and authenticate the user.

Key Benefits:

  • Easy Revocation: A session can be invalidated anytime by deleting the session data.
  • Centralized Security: Sensitive information stays on the server.

Challenges:

  • Distributed Systems: In multi-server environments, all servers need access to the same session data, requiring a centralized session store like Redis.
  • Added Latency: Fetching session data adds overhead to each request.

JWT-Based Authentication

JWTs take a different approach:

  1. Login and Token Generation:

    • The user sends login credentials to the server.
    • The server verifies them and generates a signed JWT containing user data.
    • The client stores the JWT (e.g., in local storage or a cookie).
  2. Subsequent Requests:

    • The client sends the JWT in request headers.
    • The server verifies the token’s signature and uses its data for authentication.

Token Authentication

Key Benefits:

  • Stateless and Scalable: No session data is stored on the server, making JWTs ideal for horizontally scalable applications.
  • Inter-Service Compatibility: In microservice architectures, services can trust the data in a verified JWT without querying the authentication service.

Challenges:

  • Token Expiration: If stolen, a JWT is valid until it expires.
  • Security Trade-Offs: The server must implement mechanisms like refresh tokens to improve security.

JWT Security: Choosing the Right Signing Algorithm

  • HMAC: A symmetric key is used for signing and verification. Simple but requires sharing the key, which may pose risks.
  • RSA/ECDSA: Asymmetric keys ensure the private key signs tokens while the public key verifies them, enhancing security for distributed systems.

When to Use Each Method

Session-Based Authentication:

  • Ideal when you need immediate session revocation.
  • Suited for applications with a centralized data store.
  • Keeps sensitive data on the server, enhancing security.

JWT-Based Authentication:

  • Best for stateless, scalable architectures.
  • Useful in microservices or when sharing authentication data with third-party services.
  • Pair JWTs with refresh tokens for a balance of security and user experience.

Conclusion

Ultimately, your choice depends on your application’s architecture, scaling requirements, and security needs. Whether you go with sessions or JWTs, understanding these mechanisms ensures a secure and seamless user experience.

FAQs

Q: What is the main difference between session-based authentication and JWT-based authentication?

A: Session-based authentication stores session data on the server, while JWT-based authentication uses a signed token containing user data.

Q: Which approach is more secure?

A: JWT-based authentication is considered more secure due to its stateless nature and the ability to use asymmetric keys for signing and verification.

Q: Can I use both session-based authentication and JWT-based authentication in my application?

A: Yes, you can use both approaches in your application, depending on the specific requirements and constraints of each feature or module.

Boost Your Resume in 10 Hours

0

IBM’s Free AI Courses: A Comprehensive Guide

Long before ChatGPT blasted onto the scene, there was IBM Watson, which rose to fame when it beat reigning champion Ken Jennings on the TV game show Jeopardy. IBM has a long history with AI and has not been sitting still. Its generative AI solution, Watsonx, focuses on enabling businesses to deploy and manage both traditional machine learning and generative AI, tailored to their unique needs.

IBM’s AI Fundamentals Program

If any company has the credibility to offer a credential on AI fundamentals, it’s IBM. The AI Fundamentals program is available on IBM’s SkillsBuild learning portal. The credential takes about 10 hours to complete, across six courses.

My Experience Taking IBM’s AI Courses

I took all the courses in the credential program, and I found them to be interesting and engaging. Each course dives into an aspect of AI and helps explain it. The videos are engaging, and the interactive experiences are compelling. I got most of the quizzes correct on the first try, but when my little dog distracted me, I wound up retaking one – with no negative impact on my coursework.

IBM’s Free AI Courses

  • Artificial Intelligence Fundamentals Learning Plan: Explore AI’s history, and then see how it can change the world. Along the way, you’ll dive deep into ways that AI makes predictions, understands language and images, and learns using circuits inspired by the human brain.
  • Introduction to Artificial Intelligence (1 hour and 15 minutes): Survey AI’s history and explore ways it can shed light on unstructured data.
  • Natural Language Processing and Computer Vision (1 hour and 30 minutes): Explore the theory of natural language and vision processing and learn how these technologies drive real-world mechanisms such as chatbots and photo analysis.
  • Machine Learning and Deep Learning (2 hours): See how machines can learn and make amazing, evidence-based predictions. Explore the logic behind computers’ ability to learn, then investigate new ways AI systems inspired by neurons in the human brain can solve difficult problems.
  • Run AI Models with IBM Watson Studio (1 hour and 45 minutes): Practice creating a machine learning model in a series of simulations, using IBM Watson Studio. This is hands-on time that can help you do actual work with AI.
  • AI Ethics (1 hour and 45 minutes): Learn about AI ethics, how they are implemented, and why AI ethics are so important in building trustworthy AI systems.
  • Your Future in AI: The Job Landscape (1 hour): Are you considering a career in AI? Learn about the AI job market’s rapid growth and the skills needed for success in this exciting field. You’ll hear how real professionals got their start and find resources and learning opportunities that could help you work alongside them.

Conclusion

In conclusion, IBM’s AI courses are a great way to learn about AI and its applications. The courses are well-structured, engaging, and provide a good balance of theory and practical knowledge. With a total of 10 hours of coursework, you can earn a verifiable credential in AI fundamentals. Whether you’re new to AI or looking to deepen your knowledge, these courses are an excellent resource.

FAQs

Q: What is the duration of the AI Fundamentals program?
A: The program takes about 10 hours to complete, across six courses.

Q: Do I need to have prior knowledge of AI to take the courses?
A: No, the courses are designed to be accessible to those with little to no prior knowledge of AI.

Q: Can I earn a verifiable credential upon completing the program?
A: Yes, you will receive a verifiable credential upon completing the program.

Q: Are the courses available for free?
A: Yes, the courses are available for free on IBM’s SkillsBuild learning portal.

Whisking Up Wonder

0

The Power of HTML Tags: Understanding

and

Introduction

HTML tags are the backbone of web development, allowing developers to structure and format content on the web. Among the many HTML tags, two of the most fundamental are

and
. In this article, we will delve into the world of these two essential tags, exploring their uses, benefits, and best practices for implementation.

The

Tag: Paragraphs and Formatting

The

tag is used to define a paragraph of text. It is one of the most frequently used HTML tags, as it provides a clear and readable way to present content. The

tag is often used in conjunction with other HTML tags, such as , , and , to add emphasis, italicize, or underline text, respectively.

Benefits of Using the

Tag

Using the

tag offers several benefits, including:

* Improved readability: The

tag helps to break up large blocks of text, making it easier for readers to scan and understand the content.
* Enhanced formatting: The

tag allows developers to add formatting to text, such as bold, italic, or underlined text, to draw attention to specific information.
* Better accessibility: The

tag is essential for accessibility, as it provides a clear and consistent way to present content, making it easier for users with disabilities to navigate and understand the content.

The
Tag: Line Breaks and Spacing

The
tag is used to insert a line break in the content. It is often used to add spacing between paragraphs, create a clear separation between sections, or to add a visual break in the content.

Benefits of Using the
Tag

Using the
tag offers several benefits, including:

* Improved readability: The
tag helps to create a clear visual separation between sections, making it easier for readers to understand the content.
* Enhanced formatting: The
tag allows developers to add space between paragraphs, making the content more readable and visually appealing.
* Better usability: The
tag is essential for usability, as it provides a clear and consistent way to add space between sections, making it easier for users to navigate the content.

Conclusion

In conclusion, the

and
tags are two fundamental HTML tags that play a crucial role in web development. By understanding their uses, benefits, and best practices for implementation, developers can create content that is both readable and visually appealing. Whether you’re a seasoned developer or a beginner, the

and
tags are essential tools to master.

FAQs

Q: What is the difference between the

and
tags?

A: The

tag is used to define a paragraph of text, while the
tag is used to insert a line break in the content.

Q: Can I use the

tag to add line breaks?

A: No, the

tag is not intended for adding line breaks. Instead, use the
tag to insert a line break.

Q: Can I use the
tag to add paragraphs?

A: No, the
tag is not intended for adding paragraphs. Instead, use the

tag to define a paragraph of text.

I Wish This Nintendo Switch 2 Logo Concept Was the Real Deal

0

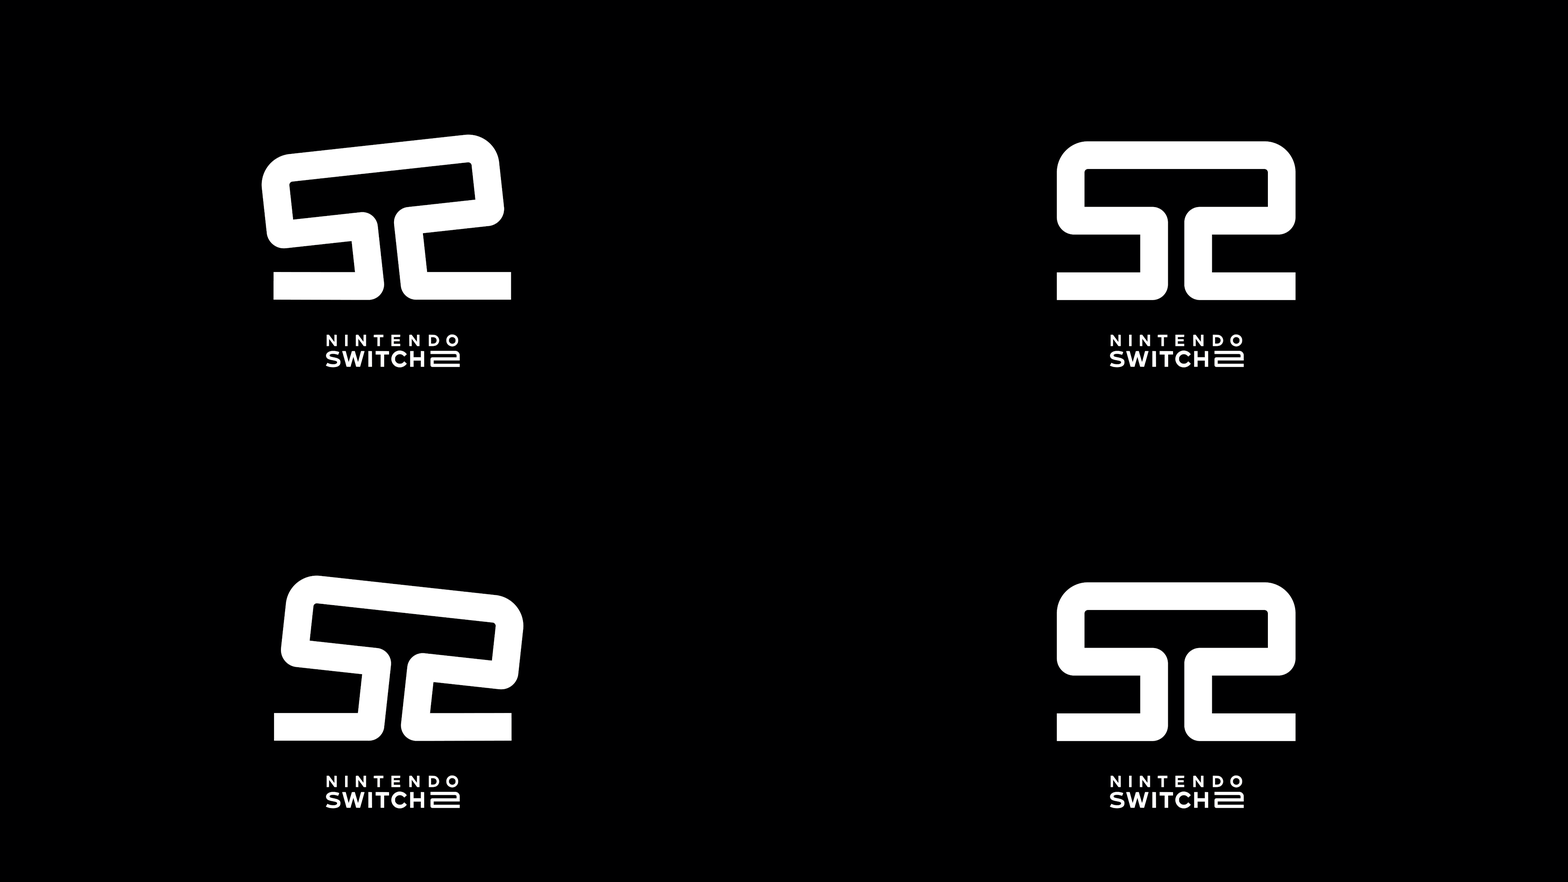
The Perfect Switch 2 Logo Concept?

The Switch 2 is the hot new gaming release on everyone’s lips with rumors flying all around the internet. While Reddit’s recent Switch 2 leaks gave us an exciting hint at specs and design, many fans were pretty underwhelmed with the potential logo, but fear not, I think I’ve found the perfect replacement.

A New Logo Concept Born from Humble Beginnings

Jason Combs, a graphic designer, created this logo concept, bringing retro visuals and ingenious design together into one slick emblem. The concept was born from a Discord chat with friends about "how Nintendo is notoriously goofy about naming sequels (‘Wii U’, ‘NEW Super Mario Bros.’ etc.)." One of his friends suggested the simple yet effective "S2" name for the Switch 2, and Jason ran with it.

The Design Process

To create the ingenious logo, Jason explains, "I whipped up a couple of versions of the mirrored S2 in Figma just using a mono-weight stroke. The ‘analog stick’ idea came when I realized I could link the top bars of the S and 2 together to create a single shape. So I spent a couple more minutes creating a left and right rotated version, threw together a quick 4-frame looping GIF, and that’s it!"

A Hit among Gaming Fans

Gaming fans on Reddit were instantly enamoured by the design, with one user writing, "This is the most creative and wonderful thing I’ve seen on this social network." Another commented, "This is PEAAAAAAAKKKKKK logo design", while another fan called it "the best console logo ever".

Conclusion

While this logo concept may not be the official design, it’s clear that Nintendo could (and should) take some serious hints from Jason’s work. For now, fans can continue to speculate about the real Switch 2 logo, but for now, we can enjoy this clever and creative concept.

FAQs

Q: What is the Switch 2?
A: The Switch 2 is the hot new gaming release on everyone’s lips, with rumors flying all around the internet.

Q: What is the potential logo for the Switch 2?
A: The potential logo is an "S2" design, which has received mixed reactions from fans.

Q: Who created the Switch 2 logo concept?
A: Graphic designer Jason Combs created the logo concept.

Q: What inspired the design?
A: The design was inspired by a Discord chat with friends about how Nintendo is notoriously goofy about naming sequels.

Q: How long did it take to create the logo?
A: Jason claims he didn’t spend more than 10 minutes on it total.

Veo 2 Dominates the Competition

0

The Power of p and br Tags in HTML

What is the Purpose of p and br Tags?

The p and br tags are two of the most fundamental elements in HTML (Hypertext Markup Language). The p tag is used to define a paragraph of text, while the br tag is used to insert a line break. These tags are essential for creating a visually appealing and readable layout on the web.

Using p Tags

The p tag is used to wrap a block of text that forms a paragraph. It is often used to separate sections of text and provide a clear visual distinction between different parts of the content. The p tag can also be used to create a single line of text that is not part of a larger paragraph.

Attributes of p Tags

The p tag has a few attributes that can be used to customize its behavior. These attributes include:

* align: This attribute is used to specify the alignment of the text within the p tag. The possible values are left, right, center, and justify.
* style: This attribute is used to specify the CSS styles that should be applied to the p tag.
* class: This attribute is used to specify the CSS class that should be applied to the p tag.

Using br Tags

The br tag is used to insert a line break in the content. It is often used to separate lines of text or to create a new line within a paragraph. The br tag is typically used in combination with the p tag to create a visually appealing layout.

Attributes of br Tags

The br tag has no attributes.

Best Practices for Using p and br Tags

When using p and br tags, it is important to follow a few best practices to ensure that your content is readable and visually appealing. These best practices include:

* Using p tags to define paragraphs of text, and br tags to insert line breaks.
* Using the align attribute to specify the alignment of text within p tags.
* Using the style attribute to specify the CSS styles that should be applied to p tags.
* Using the class attribute to specify the CSS class that should be applied to p tags.

Conclusion

In conclusion, the p and br tags are two of the most fundamental elements in HTML. They are used to define paragraphs of text and insert line breaks, and are essential for creating a visually appealing and readable layout on the web. By following best practices and using these tags correctly, you can create high-quality content that is easy to read and understand.

FAQs

Q: What is the difference between the p and br tags?

A: The p tag is used to define a paragraph of text, while the br tag is used to insert a line break.

Q: Can I use the br tag to create a new paragraph?

A: No, the br tag is used to insert a line break, not to create a new paragraph. To create a new paragraph, you should use the p tag.

Q: Can I use the p tag to insert a line break?

A: Yes, the p tag can be used to insert a line break by using the br tag within the p tag.

Q: What are some best practices for using p and br tags?

A: Some best practices for using p and br tags include using p tags to define paragraphs of text, and br tags to insert line breaks, and using the align, style, and class attributes to customize the behavior of the tags.

AI War Heats Up

0

The AI Update Frenzy: Can Anyone Keep Up?

Over the past month, we’ve seen a rapid cadence of notable AI-related announcements and releases from both Google and OpenAI, and it’s been making the AI community’s head spin. It has also poured fuel on the fire of the OpenAI-Google rivalry, an accelerating game of one-upmanship taking place unusually close to the Christmas holiday.

The Rumors and the Releases

Rumors travel quickly in the AI world, and people in the AI industry had been expecting OpenAI to ship some major products in December. Once OpenAI announced “12 days of OpenAI” earlier this month, Google jumped into gear and seemingly decided to try to one-up its rival on several counts. So far, the strategy appears to be working, but it’s coming at the cost of the rest of the world being able to absorb the implications of the new releases.

Keeping Up with the Google AI Rush

“12 Days of OpenAI has turned into like 50 new @GoogleAI releases,” wrote another X user on Monday. “This past week, OpenAI & Google have been releasing at the speed of a new born startup,” wrote a third X user on Tuesday. “Even their own users can’t keep up. Crazy time we’re living in.”

The Google AI Rush

OpenAI’s “12 Days of OpenAI” campaign has included releases of their full o1 model, an upgrade from o1-preview, alongside o1-pro for advanced “reasoning” tasks. The company also publicly launched Sora for video generation, added Projects functionality to ChatGPT, introduced Advanced Voice features with video streaming capabilities, and more.

Conclusion

As the AI community tries to keep up with the rapid pace of releases from both Google and OpenAI, it’s clear that the rivalry between the two companies is heating up. While it’s exciting to see new innovations and technologies emerge, it’s also important to take a step back and consider the implications of these releases on the wider world. As one user put it, “Somebody told Google that they could just do things,” referring to a common motivational meme telling people they “can just do stuff.”

FAQs

Q: What is “12 Days of OpenAI”?

A: “12 Days of OpenAI” is a campaign by OpenAI to release a series of new AI-related products and features over the course of 12 days, starting from December 1st.

Q: What are some of the major releases from Google and OpenAI?

A: Some of the major releases from Google and OpenAI include Google’s Gemini Flash 2.0 and ChatGPT with screenshare capabilities, OpenAI’s o1 model, Sora for video generation, and ChatGPT Projects functionality.

Q: How do I keep up with the latest AI updates?

A: You can follow AI industry leaders and influencers on social media platforms like X to stay up-to-date on the latest AI-related releases and developments. You can also check out AI-related websites and blogs for regular updates and analysis.

Q: What are the implications of these releases on the wider world?

A: The implications of these releases are still being explored, but they have the potential to transform industries and change the way we live and work. As the AI community continues to evolve, it’s important to consider the ethical and societal implications of these technologies.